Mastering Adobe Photoshop Smart Object Replacement: A Step-by-Step Guide
When it comes to updating smart objects in Adobe Photoshop, the traditional manual approach has been the go-to method for designers. In this section, we’ll walk through the laborious steps involved in manually replacing smart objects and highlight the challenges that arise during this process.
Manual Smart Object Replacement: The Traditional Struggle
Before the advent of automation plugins, designers were tasked with the painstaking process of manually replacing smart objects. Let’s explore the manual method and shed light on its inherent challenges.
Step 1: Identify Smart Objects for Replacement
Begin by identifying the smart objects within your project that require replacement. This involves manually locating each instance, a process that becomes increasingly time-consuming as the project size grows.
Step 2: Open Each Smart Object Individually
Once identified, manually open each smart object individually. For projects with numerous instances, this step alone can lead to a significant time investment.
Step 3: Locate Replacement Image
Locate the replacement image you wish to use. Manually navigating to each replacement image and ensuring it aligns perfectly with the existing smart object can be a meticulous and error-prone task.
Step 4: Resize and Adjust Manually
Resize and adjust the replacement image to fit the dimensions of the smart object. This manual resizing process can result in inconsistencies and may require meticulous fine-tuning.
Step 5: Save and Repeat
After each manual replacement, save the smart object and repeat the process for every instance throughout the project. This repetitive cycle not only consumes valuable time but also increases the likelihood of errors.

Challenges of Manual Smart Object Replacement:
Time-Consuming:
The manual method is inherently time-consuming, especially for projects with multiple smart objects.
Risk of Errors:
As each replacement is executed individually, there is a higher risk of overlooking details or introducing inconsistencies.
Limited Scalability:
The manual process becomes increasingly impractical and overwhelming as the scale and complexity of a project grow.
How to Batch Replace Smart Objects in Adobe Photoshop with an efficient Plugin?
Now that we’ve navigated the challenges of the manual approach, let’s explore an alternative that revolutionizes smart object replacement in Adobe Photoshop:
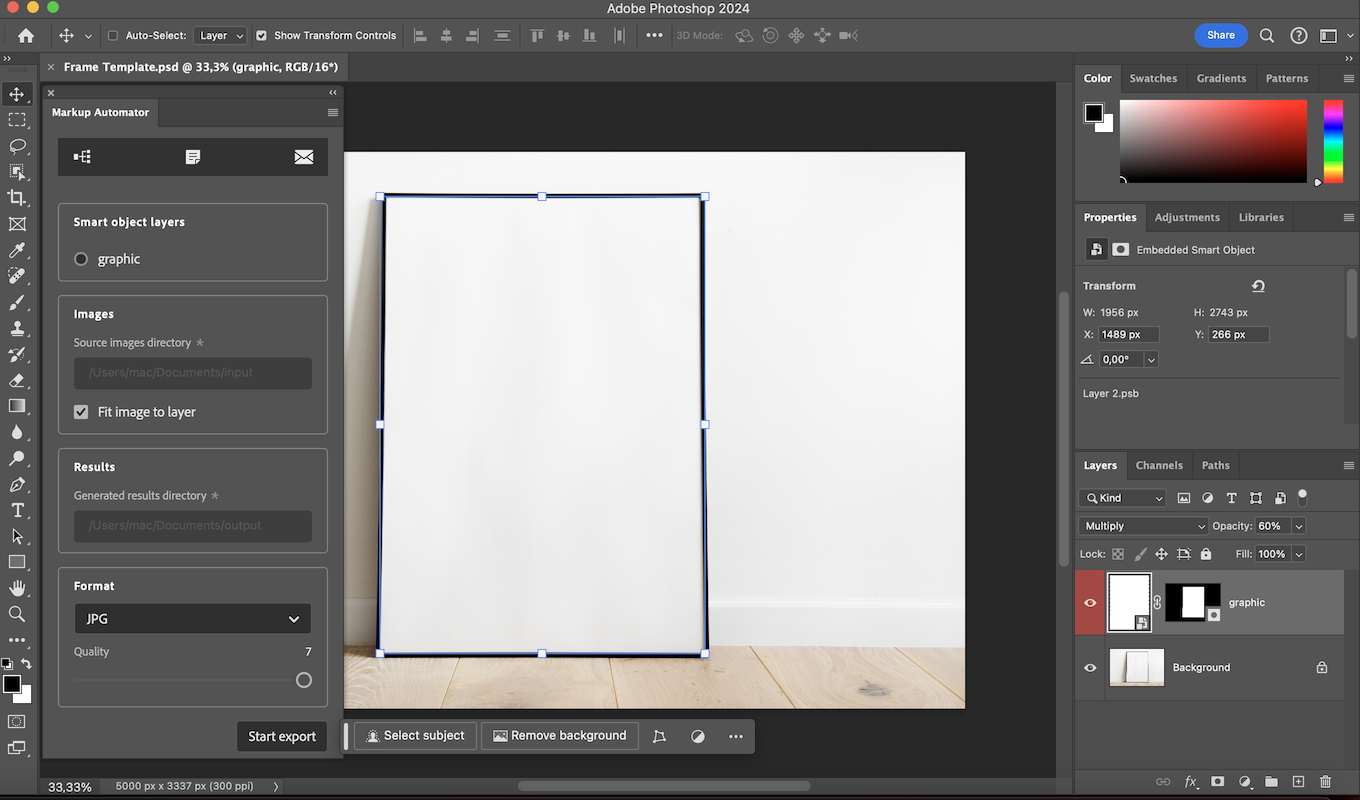
Markup Automator: an automation plugin designed to streamline this tedious process.
When it comes to streamlining your design workflow in Adobe Photoshop, mastering the art of batch replacing smart objects is a game-changer. In this step-by-step guide, we’ll walk you through the process of using Markup Automator to achieve seamless smart object replacements, saving you valuable time and ensuring precision in your designs.
Step 1: Install Markup Automator
Begin by installing Markup Automator: this Photoshop plugin is designed to automate smart object replacements in Adobe Photoshop. Follow this link to get it from the Adobe Creative Cloud marketplace, download the plugin, and follow the installation instructions provided. Ensure compatibility with your Photoshop version.
Step 2: Open Your Photoshop Project
Launch Adobe Photoshop and open the project where you want to batch replace smart objects.
Step 3: Locate the Smart Objects to Replace
Identify the smart objects within your project that need replacement. Markup Automator allows you to target specific smart objects, providing a flexible and customizable approach to batch processing.
Step 4: Choose Replacement Images
Once your project is open, access the plugin interface within Photoshop. This is typically found in the “Plugins” menu. Once open, select the smart object where you want to insert the images and locate the replacement images you want to use. Markup Automator is designed to accept multiple images as input, allowing you to batch replace smart objects with a variety of sources.
Step 5: Initiate Batch Replacement of your smart Object
With your settings configured, initiate the batch replacement process. Markup Automator will seamlessly replace the identified smart objects with the chosen images, ensuring consistency and precision throughout your project.
Step 6: Save and Enjoy Your Enhanced Design
Save your project, and you’re ready to share your enhanced design. Thanks to the efficiency gained through the Adobe Photoshop Markup Automator plugin, you’ve successfully streamlined your workflow and achieved professional results.

At the culmination of this article, dive into a comprehensive video demonstration showcasing the transformative capabilities of our Adobe Photoshop plugin : Markup Automator. Witness firsthand how this powerful tool simplifies the process of smart object replacement, significantly reducing design time and boosting overall efficiency. The video guides you through the plugin’s intuitive interface, demonstrating seamless integration into your workflow. This video serves as a visual guide to how Markup Automator can elevate your creative process. It’s time to transform the way you work and unlock the full potential of your design projects.